Panduit Auto Size
 Lets you to re-select components
based on the size requirement that the shortest distance program returns.
Lets you to re-select components
based on the size requirement that the shortest distance program returns.
Overview
When you first place a wire path, you can assign a preliminary part selection to it. This preliminary selection should indicate the type of component. You can then use the Auto Sizefunction to automatically replace the preliminary selection with an appropriately sized part of the same type as the preliminary selection.
This feature is especially useful when using the shortest distance function. At the time you place a wire path for the shortest distance program to use for routing, the number of wires going through a given wire path is usually unknown. The user can assign a preliminary part number to specify the type of hardware to use. Then the shortest distance program can compute the wire paths and the Auto Size function can re-size the component.
In the case of devices like cable ties mounts, the criteria of weight is used. You have the option to change the number of mounts OR the size of the mounts to account for the change in weight. If you choose not to use shortest distance output you can use the wire fill calculator to specify the exact number of wires to auto size-space for.
Setup
You must enter in the parts database the diameters for all of the cable part numbers used in the project. See the Configuration File Formats for information on which field to use. You must also enter all of their wire diameters into the wire lookup table. All wires in the project should have their gauges defined and all cables must have part numbers assigned. The calculator will list any gauges and cable part numbers used in the current project. You should have either used the wire fill calculator OR run the shortest distance program to route the wires.

| Setting | Description |
|---|---|
| All | Determines if all wire paths on the current page should be analyzed. |
| Select One Path | Determines if one particular path is to be analyzed. If one path is to be analyzed, select the ID from the drop-down list (or you can use the Pick Path button and then click on the desired path in the drawing). |
| Use Shortest Distance Output | If the shortest distance routing is to be used, select this check box. If this check-box is unchecked, the number of wires and cables in the path is taken from the fill area calculator. |
| Select Part Number Type | Select check boxes for the types of components to analyze. For example, you may want to re-size duct but not cable ties. Additionally, parts that were not marked with the AutoSelect check box when the preliminary part was selected will not be analyzed. |
| Auto-space | Only affects calculations for mounts and weight-rated, spaced devices. If Auto-space is on, the quantity of parts is changed to the total weight of the wires and cables, divided by the percent fill, divided by the weight rating of the selected part number. If Auto-space is off, the software will attempt to find a different size mount to carry the calculated weight. In either case, percent fill acts as a safety rating. A 50% fill would provide twice as many mounts or the same number with twice the capacity as would theoretically be required. This is in addition to the margin for error that is built into the calculations because no adjustment is made for the density of the insulator being less than the density of copper. |
| Change All | Select this option if you wish the software to automatically make all of the required changes to the wire paths being analyzed without giving you the opportunity to review or change the automatic selections. |
| Step Through Changes | Select this option if you wish the software to stop execution at any wire path which does not have the parts or spacing that the program recommends. A dialog will appear that shows the changed values and you may cancel all changes, accept all, or make your own modifications and then accept the changes. |
| Step Through All | Select this option if you wish the software to display a dialog at each analyzed wire path, even if no change was detected by the software. |
| Preferred Duct Height (Z) | Determines the selection of rectangular duct part numbers when there are multiple selections that would fit the area requirements. For example if a preliminary part with dimensions of 2 inches high and 2 inches wide was selected, the auto size might have a requirement for 6 square inches. This requirement could be met by a 2 inch high by 3inch wide duct, or 3inch high by 2 inch wide duct. Entering a preferred duct height of 2 would result in the 2 inch high part number being selected. |
| Max % Fill | Specifies the percent fill to be allowed for duct and also provides a safety factor for mounts or other auto sized parts. For duct calculations the actual cross sectional area available is maintained in the database. (Nominal area calculated from the outside nominal dimensions is not used.) |
| Start | Begins the analysis. |
The software will select an appropriate part number based on your settings and the number of wires assigned to this path. If you selected the Change All setting, the software will run until all paths have been assigned parts. If you selected Step Through Changes or Step Through All, the software will display the following Part Number Modification dialog, either through paths requiring a different part number assignment or for all paths.
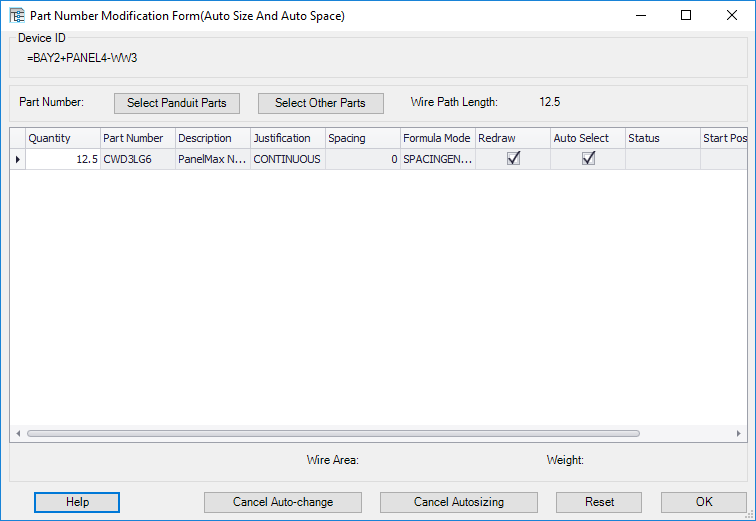
Select OK to accept the listed part. If you need to assign additional Panduit parts to the wire path, select the Select Panduit Parts button to display the Part Number Assignment dialog. If you need to assign additional non-Panduit parts to the wire path, select the Select Other Parts button.
Select the Cancel Auto-change button if you wish to skip the current wire path and continue with other paths (assuming you have selected all paths for the Auto Size-Space function).
Select the Cancel Autosizing button if you wish to exit the Auto Size-Space function without making further assignments.